I’ve been trying to post this pattern to my website and wordpress blog for the past hour with no luck. Thankfully tumblr seems to like me. My goal was to have this pattern finished by the end of the day, I just have a couple mins left to spare. :-)
I’ll be back when my laptop or ipad decide to work properly to post to other sites and edit any formatting issues.
Enjoy!
Fingerless Mittens
Copyright Designs byZuLa 2013
US & UK Stitch Versions Included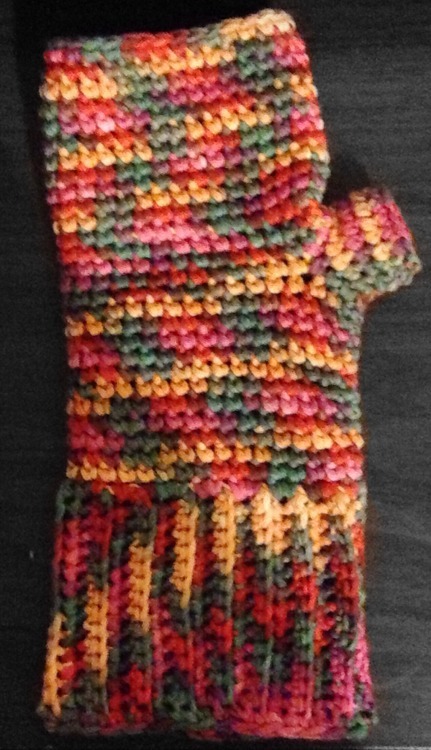
A quick and easy project to keep your hands warm while still allowing you proper use of your fingers. Change hook sizes to change the mitten size and you can make a pair for every member of your family. Great as gifts or to treat yourself.
Don’t forget to make two! 😉
MATERIALS
4mm Crochet hook (Small)
4.5mm Crochet hook (Medium)
5mm Crochet hook (Large)
Approx. 147 metres/161 yards of DK/8 ply/Sport Weight Yarn
Yarn needle to weave in ends
MEASUREMENTS
Small
Mitten width - 3 inches and stretches to 4 inches
Mitten length - 5 1/4 inches
Full Mitten length - 8 inches
Cuff width - 3 1/4 inches and stretches to 4 1/2 inches
Cuff length - 2 3/4 inches
Thumb width - 1 1/4 inches
Thumb length - 1 inch
Medium
Mitten width - 3 1/4 inches and stretches to 4 1/4 inches
Mitten length - 5 1/4 inches
Full Mitten length - 8 1/2 inches
Cuff width - 3 1/2 inches and stretches to 4 3/4 inches
Cuff length - 3 inches
Thumb width - 1 1/3 inches
Thumb length - 1 1/4 inches
Large
Mitten width - 3 1/2 inches and stretches to 4 1/2 inches
Mitten length - 5 1/2 inches
Full Mitten length - 8 3/4 inches
Cuff width - 3 3/4 inches and stretches to 5 inches
Cuff length - 3 1/4 inches
Thumb width - 1 1/2 inches
Thumb length - 1 1/3 inches
GAUGE
Small - 2 inches = 10 st x 11 rows
Medium - 2 inches = 9 st x 10 rows
Large - 2 inches = 8 st x 9 rows
NOTES
The cuff stitches are worked into the back loops only until the last cuff row.
The mitten rows are worked in the round.
US STITCH VERSION
CUFF
Work in the back loops only for the cuff…
1.) Chain 15, 1 sc in 2nd chain from hook and in each ch to the end, ch 1 and turn. (14 sc)
2-31.) 1 sc in same st and in each back loop to the end, ch 1 and turn. (14 sc)
Now work in both loops…
32.) 1 sc in same st and in each st to the end. Do not turn. (14 sc)
Joining Row
Fold the cuff in half with the wrong side facing out and sl st the 1st and the last row together. Sl st through each st and corresponding chain. (14 sl st)
Turn cuff to right side…
Ch 1, sc in the end of each row to the end. There should be 32 sts evenly spaced around the cuff. Join with sl st to 1st sc. Fasten off and weave in ends. (32 sc)
MITTEN
Join yarn with sl st to the top of the sl st row of the unworked end of cuff.
1.) Ch 1, sc in same st, and in the end of each row around. There should be 32 sts evenly spaced around the cuff. (32 sc)
2-13.) Continue working in the round up to row 13, using a stitch marker if needed to keep track.
THUMB HOLE
At the end of row 13 work the thumb hole as follows…
14.) Ch 6, sk next 6 st, sc in 7th st and continue working sc’s in the round. When you reach the ch 6 again, sc in the chains and continue crocheting around.
15-27.) Continue working in sc in the round. At the end of this row, sl st into the next 3 sts to create a more level row.
28.) Ch 1, 1 sc in same st and in each st around, join with sl st to 1st sc.
Fasten off and weave in ends.
THUMB
1.) Join yarn to any st at the thumb hole, sc in same st and in each st around and work 1 extra st in either corner. (14 sc)
2-4.) Continue working in sc in the round. At the end of this row, sl st into the next 3 sts to create a more level row.
5.) Ch 1, 1 sc in same st and in each st around, join with sl st to 1st sc. (14)
Fasten off and weave in ends.
Do I have to tell you to repeat this for the other hand? 😉
UK STITCH VERSION
CUFF
Work in the back loops only for the cuff…
1.) Chain 15, 1 dc in 2nd chain from hook and in each ch to the end, ch 1 and turn. (14 dc)
2-31.) 1 dc in same st and in each back loop to the end, ch 1 and turn. (14 dc)
Now work in both loops…
32.) 1 dc in same st and in each st to the end. Do not turn. (14 dc)
Joining Row
Fold the cuff in half with the wrong side facing out and sl st the 1st and the last row together. Sl st through each st and corresponding chain. (14 sl st)
Turn cuff to right side…
Ch 1, dc in the end of each row to the end. There should be 32 sts evenly spaced around the cuff. Join with sl st to 1st dc. Fasten off and weave in ends. (32 dc)
MITTEN
Join yarn with sl st to the top of the sl st row of the unworked end of cuff.
1.) Ch 1, dc in same st, and in the end of each row around. There should be 32 sts evenly spaced around the cuff. (32 dc)
2-13.) Continue working in the round up to row 13, using a stitch marker if needed to keep track.
THUMB HOLE
At the end of row 13 work the thumb hole as follows…
14.) Ch 6, sk next 6 st, dc in 7th st and continue working dc’s in the round. When you reach the ch 6 again, dc in the chains and continue crocheting around.
15-27.) Continue working in dc in the round. At the end of this row, sl st into the next 3 sts to create a more level row.
28.) Ch 1, 1 dc in same st and in each st around, join with sl st to 1st dc.
Fasten off and weave in ends.
THUMB
1.) Join yarn to any st at the thumb hole, dc in same st and in each st around and work 1 extra st in either corner. (14 dc)
2-4.) Continue working in dc in the round. At the end of this row, sl st into the next 3 sts to create a more level row.
5.) Ch 1, 1 dc in same st and in each st around, join with sl st to 1st dc. (14)
Fasten off and weave in ends.
Do I have to tell you to repeat this for the other hand? 😉
Copyright 2013 Designs byZula.
www.byzula.com
I have no problem with customers using my patterns to make items and sell them. I do
however ask
that you not pass the patterns off as your own, or sell and distribute them. Thanks so much for being
an honest and valued customer. :-)
Any questions, error reports or comments, please don’t hesitate to contact me.
All rights reserved.
No comments:
Post a Comment