I have been so wrapped up in deciding what to design next that I forgot to post my latest free crochet pattern!! My poor forgetful brain! lol This post should have been done days ago!
Wrist Pouch
Copyright Designs byZula 2013
US and UK stitch versions included
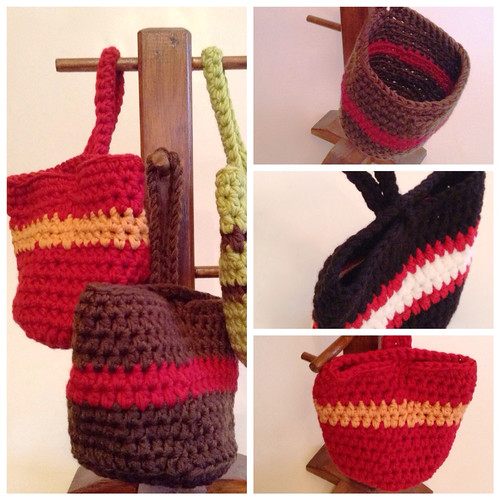
This easy to crochet Wrist Pouch can be whipped up in no time! Sturdy and fun to carry, it has so many uses for both adults and children. You can use it on short outings when you don't feel like being weighed down with your handbag. Kids can use them for holding marbles, toys, or even shells they find at the seaside. Can even be used on a night out if you use a more fashionable yarn. Crochet it in solid colours or any stripe combination. It's a great way to use up any scrap yarn as well.
The uses and colour combos for this Wrist Pouch are only limited to your imagination. So get crocheting!
MATERIALS
I/5.5mm hook
Approx. 53yds/49m x 2 DK weight yarn (8 ply) for the small pouch
Approx. 63yds/58m x 2 DK weight yarn (8 ply) for the large pouch
*will be holding two strands of yarn together.
Yarn needle to weave in ends
GAUGE
6 st and 6 rows = 2 inches
MEASUREMENTS
Small
Width - 3 1/2 inches
Height - 4 1/2 inches
Wrist strap is 8 inches in length.
Large
Width - 4 1/2 inches
Height - 5 inches
Wrist Strap is 10 inches in length.
NOTES
*No turning after rows.
*Pouch is crocheted using 2 strands of yarn.
*"to the end" refers to directions between * *.
*The strap can be easily shortened or lengthened. Increase or decrease the chain amount to suit your individual needs.
US Stitch Version
SMALL
Using 2 strands of yarn, form an adjustable loop...
1.) Ch 1, 8 hdc's in ring. Join with a sl st to top of 1st st. (8)
2.) Ch 1, 2 hdc's in same st and in each st to the end. Join with a sl st to top of 1st st. (16)
3.) Ch 1, 2 hdc's in same st, 1 hdc in next st, *2 hdc's in next st, 1 hdc in next st*, to the end. Join with a sl st to top of 1st st. (24)
4.) Ch 1, 2 hdc's in same st, 1 hdc in each of the next 2 st, *2 hdc's in next st, 1 hdc in each of the next 2 st*, to the end. Join with a sl st to top of 1st st. (32)
5-7.) Ch 1, 1 hdc in same st and in each st to the end. Join with a sl st to top of 1st st. (32)
*The following four rows are for the colour changes. If you only want 2 rows of stripes, then start the colour changes on row 10 and change to main colour on row 12.
8-11.) Ch 1, 1 hdc in same st and in each st to the end. Join with a sl st to top of 1st st. (32)
*Change back to main colour.
12-13.) Ch 1, 1 hdc in same st and in each st to the end. Join with a sl st to top of 1st st. (32)
14.) Chain 25, (be careful not to twist the chain), sl st in same sp, ch 1, 1 sc in next st and in each of the next 14 st. Chain 3, sk next 3 st, 1 sc in next st and in each of the next 13 st. Join with a sl st to 1st ch.
15.) Ch 1, 1 sc in same st and in each st and ch around. Join with a sl st to top of 1st st. (57)
Fasten off and weave in ends.
LARGE
Using 2 strands of yarn, form an adjustable loop...
1.) Ch 1, 8 hdc's in ring. Join with a sl st to top of 1st st. (8)
2.) Ch 1, 2 hdc's in same st and in each st to the end. Join with a sl st to top of 1st st. (16)
3.) Ch 1, 2 hdc's in same st, 1 hdc in next st, *2 hdc's in next st, 1 hdc in next st*, to the end. Join with a sl st to top of 1st st. (24)
4.) Ch 1, 2 hdc's in same st, 1 hdc in each of the next 2 st, *2 hdc's in next st, 1 hdc in each of the next 2 st*, to the end. Join with a sl st to top of 1st st. (32)
5.) Ch 1, 2 hdc's in same st, 1 hdc in each of the next 3 st, *2 hdc's in next st, 1 hdc in each of the next 3 st*, to the end. Join with a sl st to top of 1st st. (40)
6-8.) Ch 1, 1 hdc in same st and in each st to the end. Join with a sl st to top of 1st st. (40)
*The following four rows are for the colour changes. If you only want 2 rows of stripes, then start the colour changes on row 10 and change to main colour on row 12.
9-12.) Ch 1, 1 hdc in same st and in each st to the end. Join with a sl st to top of 1st st.(40)
*Change back to main colour.
13-14.) Ch 1, 1 hdc in same st and in each st to the end. Join with a sl st to top of 1st st. (40)
15.) Chain 30, (be careful not to twist the chain), sl st in same sp, ch 1, 1 sc in next st and in each of the next 18 st. Chain 3, sk next 3 st, 1 sc in next st and in each of the next 17 st. Join with a sl st to 1st ch.
16.) Ch 1, 1 sc in same st and in each st and ch around. Join with a sl st to top of 1st st.
Fasten off and weave in ends. (70)
UK Stitch Version
SMALL
Using 2 strands of yarn, form an adjustable loop...
1.) Ch 1, 8 htr's in ring. Join with a sl st to top of 1st st. (8)
2.) Ch 1, 2 htr's in same st and in each st to the end. Join with a sl st to top of 1st st. (16)
3.) Ch 1, 2 htr's in same st, 1 htr in next st, *2 htr's in next st, 1 htr in next st*, to the end. Join with a sl st to top of 1st st. (24)
4.) Ch 1, 2 htr's in same st, 1 htr in each of the next 2 st, *2 htr's in next st, 1 htr in each of the next 2 st*, to the end. Join with a sl st to top of 1st st. (32)
5-7.) Ch 1, 1 htr in same st and in each st to the end. Join with a sl st to top of 1st st. (32)
*The following four rows are for the colour changes. If you only want 2 rows of stripes, then start the colour changes on row 10 and change to main colour on row 12.
8-11.) Ch 1, 1 htr in same st and in each st to the end. Join with a sl st to top of 1st st.(32)
*Change back to main colour.
12-13.) Ch 1, 1 htr in same st and in each st to the end. Join with a sl st to top of 1st st. (32)
14.) Chain 25, (be careful not to twist the chain), sl st in same sp, ch 1, 1 dc in next st and in each of the next 14 st. Chain 3, sk next 3 st, 1 dc in next st and in each of the next 13 st. Join with a sl st to 1st ch.
15.) Ch 1, 1 dc in same st and in each st and ch around. Join with a sl st to top of 1st st. (57)
Fasten off and weave in ends.
LARGE
Using 2 strands of yarn, form an adjustable loop...
1.) Ch 1, 8 htr's in ring. Join with a sl st to 1st st. (8)
2.) Ch 1, 2 htr's in same st and in each st to the end. Join with a sl st to top of 1st st. (16)
3.) Ch 1, 2 htr's in same st, 1 htr in next st, *2 htr's in next st, 1 htr in next st*, to the end. Join with a sl st to top of 1st st. (24)
4.) Ch 1, 2 htr's in same st, 1 htr in each of the next 2 st, *2 htr's in next st, 1 htr in each of the next 2 st*, to the end. Join with a sl st to top of 1st st. (32)
5.) Ch 1, 2 htr's in same st, 1 htr in each of the next 3 st, *2 htr's in next st, 1 htr in each of the next 3 st*, to the end. Join with a sl st to top of 1st st. (40)
6-8.) Ch 1, 1 htr in same st and in each st to the end. Join with sl st to top of 1st st. (40)
*The following four rows are for the colour changes. If you only want 2 rows of stripes, then start the colour changes on row 10 and change to main colour on row 12.
9-12.) Ch 1, 1 htr in same st and in each st to the end. Join with a sl st to top of 1st st. (40)
*Change back to main colour.
13-14.) Ch 1, 1 htr in same st and in each st to the end. Join with a sl st to top of 1st st. (40)
15.) Chain 30, (be careful not to twist the chain), sl st in same sp, ch 1, 1 dc in next st and each of the next 18 st. Chain 3, sk next 3 st, 1 dc in next st and in each of the next 17 st. Join with a sl st to 1st ch.
16.) Ch 1, 1 dc in same st and in each st and ch around. Join with a sl st to top of 1st st.
Fasten off and weave in ends. (70)
Copyright Designs byZula 2013
www.byzula.com
I have no problem with customers using my patterns to make items and sell them. I do however ask
that you not pass the patterns off as your own, or sell and distribute them. Thanks so much for being
an honest and valued customer. :-)
Any questions, error reports or comments, please don't hesitate to contact me at designsbyzula@gmail.com.
All rights reserved.
2 comments:
Thanks for sharing, Zu! I think our GrandLove girls would love these!
So glad you like the new pattern! :-)
Post a Comment